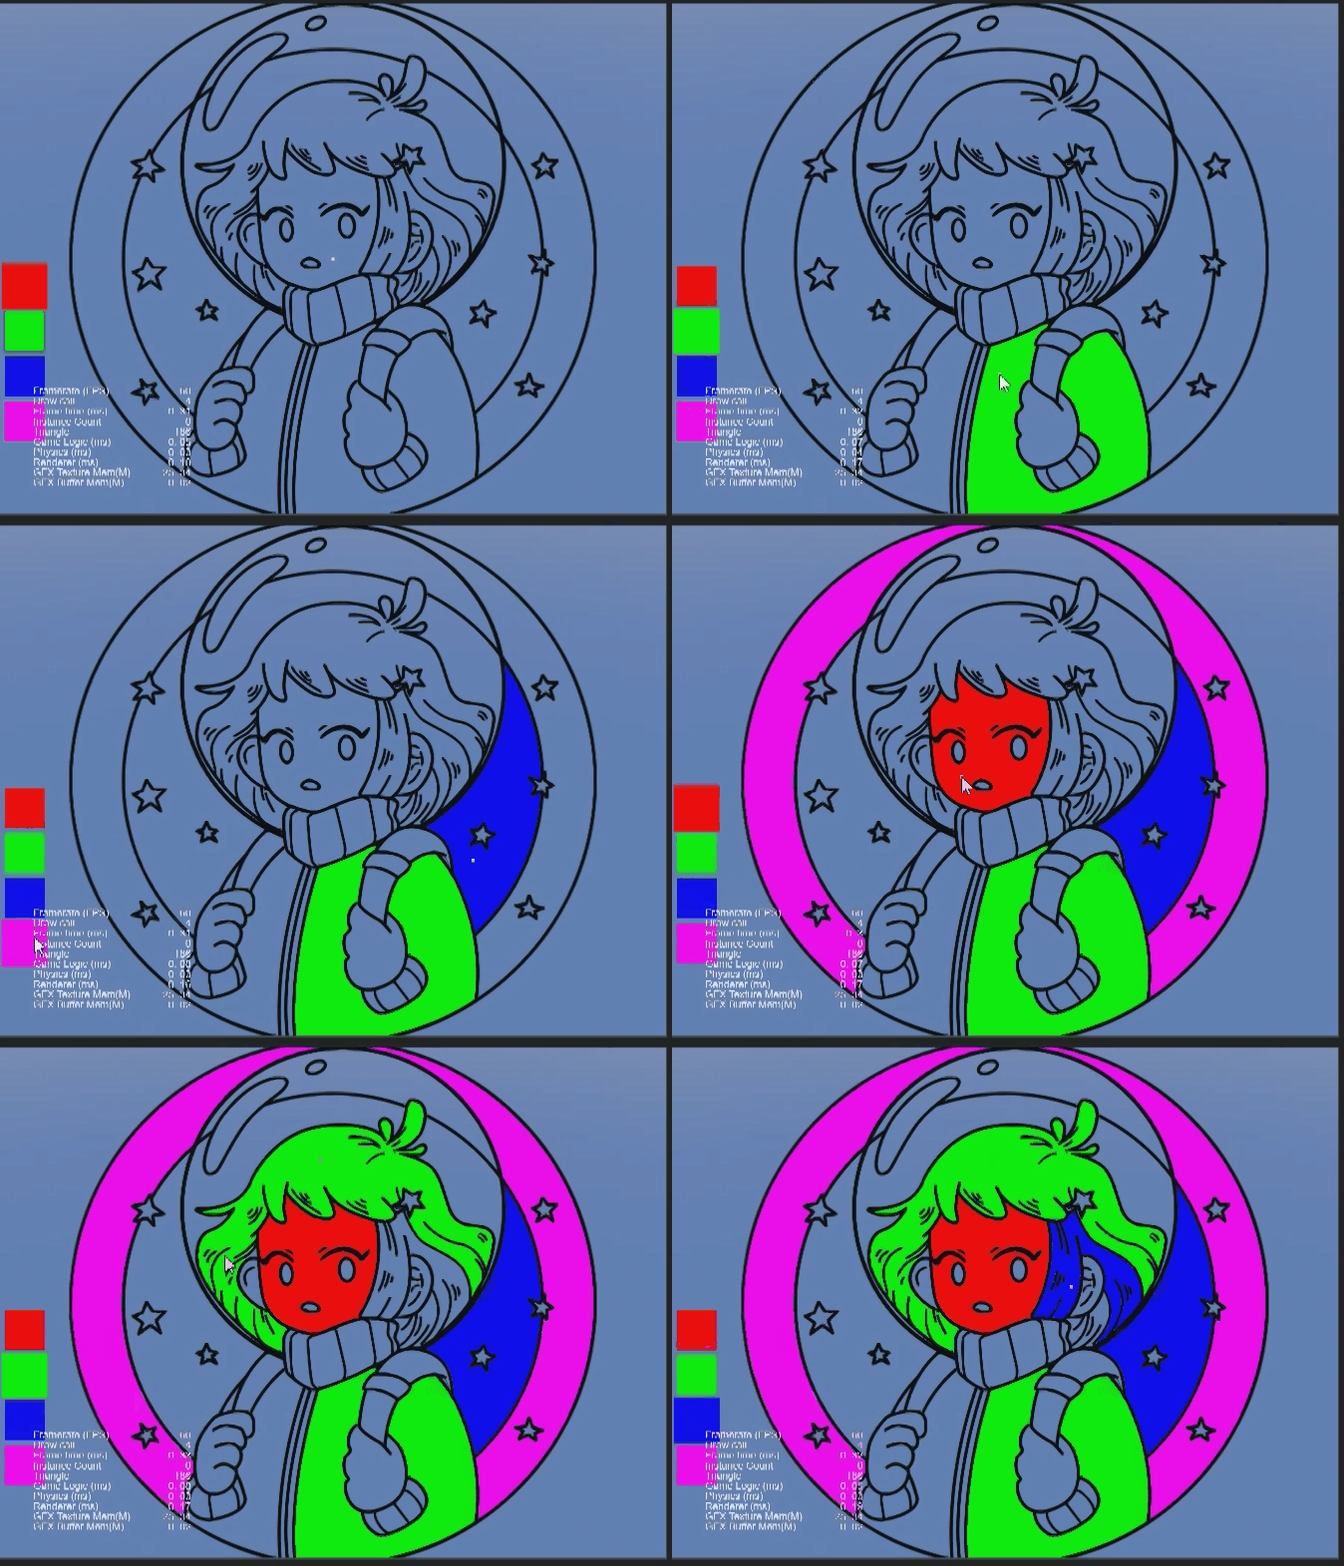
cc3d线稿点击区块填充颜色
一下来自cc论坛,仅供参考,还未亲手总结。
import { Color, director, gfx, IVec2, Texture2D, v2 } from "cc";
import Timer from "framework/extention/Timer";
enum GridIndex { Center, Up, Down, Left, Right }
const gridIndexOffset: readonly IVec2[] = [null, v2(0, +1), v2(0, -1), v2(-1, 0), v2(+1, 0)];
const gridIndexNeighbors: Array<GridIndex>[] = [];
gridIndexNeighbors[GridIndex.Center] = [GridIndex.Up, GridIndex.Down, GridIndex.Left, GridIndex.Right];
gridIndexNeighbors[GridIndex.Up] = [GridIndex.Up, GridIndex.Left, GridIndex.Right];
gridIndexNeighbors[GridIndex.Down] = [GridIndex.Down, GridIndex.Left, GridIndex.Right];
gridIndexNeighbors[GridIndex.Left] = [GridIndex.Left, GridIndex.Up, GridIndex.Down];
gridIndexNeighbors[GridIndex.Right] = [GridIndex.Right, GridIndex.Up, GridIndex.Down];
export default class ColorFillTexture {
    public readonly texture: Texture2D;
    public readonly sourceData: Uint8Array;
    public readonly targetData: Uint8Array;
    public readonly width: number;
    public readonly height: number;
    public constructor(source: Texture2D, public alphaThreshold: number = 100, public maxFillCount: number = 30) {
        this.sourceData = ColorFillTexture.readTexturePixels(source);
        this.targetData = Uint8Array.from(this.sourceData);
        this.texture = ColorFillTexture.createTextureFromPixels(this.targetData, source.width, source.height);
        this.width = this.texture.width;
        this.height = this.texture.height;
    }
    public setTextureColor(color: Color, x: number, y: number): boolean {
        x = ColorFillTexture.translateX(this.width, x);
        y = ColorFillTexture.translateY(this.height, y);
        return this.setColor(color, x, y);
    }
    private setColor(color: Color, x: number, y: number): boolean {
        if (x < 0 || y < 0 || x > this.width || y > this.height) return false;
        if (ColorFillTexture.getAlphaColor(this.sourceData, this.width, x, y) > this.alphaThreshold) return false;
        ColorFillTexture.setBufferColor(this.targetData, this.width, x, y, color);
        return true;
    }
    public updateTextureData(): void {
        this.texture.uploadData(this.targetData);
    }
    public fillTextureColor(color: Color, x: number, y: number) {
        x = ColorFillTexture.translateX(this.width, x);
        y = ColorFillTexture.translateY(this.height, y);
        this.fillColor(color, x, y, gridIndexNeighbors[GridIndex.Center]);
    }
    private async fillColor(color: Color, x: number, y: number, gridIndexTypes: readonly GridIndex[]) {
        let colorPointList1 = [{ x, y, neighborTypes: gridIndexTypes }];
        let colorPointList2 = [];
        let filleCount = 0;
        do {
            for (const item of colorPointList1) {
                const result = this.setColor(color, item.x, item.y);
                if (!result) continue;
                for (const type of item.neighborTypes) {
                    const offset = gridIndexOffset[type];
                    const nx = item.x + offset.x, ny = item.y + offset.y;
                    if (ColorFillTexture.getAlphaColor(this.targetData, this.width, nx, ny) == color.a) continue;
                    if (colorPointList2.find(v => v.x == nx && v.y == ny) == null)
                        colorPointList2.push({ x: nx, y: ny, neighborTypes: gridIndexNeighbors[type] });
                }
            }
            let temp = colorPointList1;
            colorPointList1 = colorPointList2;
            colorPointList2 = temp;
            colorPointList2.length = 0;
            if (++filleCount > this.maxFillCount) {
                filleCount = 0;
                this.updateTextureData();
                await Timer.instance.waitForTime(0);
            }
        } while (colorPointList1.length > 0);
        this.updateTextureData();
    }
    /**
     * 转成到图片坐标系,Cocos默认坐标系是图片的中心点,X方向向右,Y方向向上,而图片格式的坐标默认是在左上角,X方向向右,Y方向向下。
     * @param width
     * @param x
     * @returns
     */
    public static translateX(width: number, x: number): number {
        return Math.trunc(x + width * 0.5);
    }
    /**
     * 转成到图片坐标系,Cocos默认坐标系是图片的中心点,X方向向右,Y方向向上,而图片格式的坐标默认是在左上角,X方向向右,Y方向向下。
     * @param height
     * @param y
     * @returns
     */
    public static translateY(height: number, y: number): number {
        return Math.trunc(-y + height * 0.5);
    }
    /**
     * 获得该颜色buffer的alpha
     * @param buffer 颜色buffer
     * @param width 图片宽度
     * @param x x坐标
     * @param y y坐标
     * @returns 该坐标的alpha
     */
    public static getAlphaColor(buffer: Uint8Array, width: number, x: number, y: number): number {
        const index = ColorFillTexture.positionToBufferIndex(width, x, y);
        return buffer[index + 3];
    }
    public static setBufferColor(buffer: Uint8Array, width: number, x: number, y: number, color: Color): void {
        const index = ColorFillTexture.positionToBufferIndex(width, x, y);
        buffer[index + 0] = color.r;
        buffer[index + 1] = color.g;
        buffer[index + 2] = color.b;
        buffer[index + 3] = color.a;
    }
    /**
     * 点坐标转换成图片buffer的索引
     * @param width 图片的宽度
     * @param x x坐标
     * @param y y坐标
     * @param colorSize 颜色是RGB还是RGBA组成
     * @returns buffer索引
     */
    public static positionToBufferIndex(width: number, x: number, y: number, colorSize: 3 | 4 = 4): number {
        return Math.trunc(x + y * width) * colorSize;
    }
    /**
     * 读取texture的像素到一个buffer
     * @param texture texture原图
     * @param width
     * @param height
     * @param x
     * @param y
     * @returns
     */
    public static readTexturePixels(texture: Texture2D, x = 0, y = 0): Uint8Array {
        const gfxTexture = texture.getGFXTexture();
        if (gfxTexture == null) return null;
        const bufferSize = 4 * texture.width * texture.height;
        const buffer = new Uint8Array(bufferSize);
        const region = new gfx.BufferTextureCopy();
        region.texOffset.x = x;
        region.texOffset.y = y;
        region.texExtent.width = texture.width;
        region.texExtent.height = texture.height;
        director.root.device.copyTextureToBuffers(gfxTexture, [buffer], [region]);
        return buffer;
    }
    /**
     * 从像素的buffer中创建一个texture
     * @param buffer 像素buffer
     * @param width 图片宽度
     * @param height 图片高度
     * @param format 图片格式
     * @param mipmapLevel 图片的mipmap等级
     * @returns 新的texture
     */
    public static createTextureFromPixels(buffer: ArrayBufferView, width: number, height: number, format = Texture2D.PixelFormat.RGBA8888, mipmapLevel?: number): Texture2D {
        const texture = new Texture2D();
        texture.reset({ width, height, format, mipmapLevel });
        texture.uploadData(buffer);
        return texture;
    }
}
使用方法
private createColorFill(texture: Texture2D): void {
        this.colorFillTexture = new ColorFillTexture(texture, logicConfig.alphaThreshold, logicConfig.maxFillCount);
        let spriteFrame = new SpriteFrame();
        spriteFrame.texture = this.colorFillTexture.texture;
        this.sprite.spriteFrame = spriteFrame;
    }

    private onImageLoad(data: string): void {
        const image = new Image();
        image.src = data;
        image.addEventListener('load', () => {
            const texture = new Texture2D();
            texture.image = new ImageAsset(image);
            this.createColorFill(texture);
        });
    }

    private onTouchStart(event: EventTouch): void {
        const location = event.touch.getUILocation(_vec2_temp1);
        const uiTransform = this.sprite.getComponent(UITransform);
        const position = uiTransform.convertToNodeSpaceAR(_vec3_temp1.set(location.x, location.y), _vec3_temp1);
        this.colorFillTexture.fillTextureColor(colors[this.indexColor], position.x, position.y);
    }
二

这个是别人参考上边的大佬做出来的。
并写了文章https://blog.csdn.net/Ctrls_/article/details/136008679?spm=1001.2014.3001.5501
目录
思路
代码
1.此脚本主要是处理texture中的内容
2.通过控制点击事件,实现上色功能
3.配置文件脚本
扩展
结束语
思路
对于里面涉及的关于图片的原理我接触的也比较少,但是思路如下:
1.通过点击的位置,将cocos坐标系位置转换为在图片坐标系位置
(转成到图片坐标系,Cocos默认坐标系是图片的中心点,X方向向右,Y方向向上,而图片格式的坐标默认是在左上角,X方向向右,Y方向向下。)
2.从图片坐标系位置开始遍历其上下左右各一个像素的Alpha值是否小于自己设置的Alpha值(我用的是255),如果是,将其颜色利用texture内部函数改变自己指定的color,从而达到改变颜色的效果;如果遇到的Alpha值等于255,则return
目的是找到途中黑色边框所框住的范围,然后上色即可(此处我是写的固定的生成绿色,可以动态去切换颜色)
因为是通过Alpha值去判断的,所以底图必须是png的透明图才可以
我是从花瓣找的一张线稿图,如图:
请添加图片描述
背景是cocos自带的单色图,我设置成橙色了
代码
代码基本上是和论坛里的代码一样,就两三个脚本,非常简洁
1.此脚本主要是处理texture中的内容
import { _decorator, Color, Component, director, gfx, IVec2, log, Node, Texture2D, v2 } from 'cc';
const { ccclass, property } = _decorator;

enum GridIndex { Center, Up, Down, Left, Right }
const gridIndexOffset: readonly IVec2[] = [null, v2(0, +1), v2(0, -1), v2(-1, 0), v2(+1, 0)];
const gridIndexNeighbors: Array<GridIndex>[] = [];
gridIndexNeighbors[GridIndex.Center] = [GridIndex.Up, GridIndex.Down, GridIndex.Left, GridIndex.Right];
gridIndexNeighbors[GridIndex.Up] = [GridIndex.Up, GridIndex.Left, GridIndex.Right];
gridIndexNeighbors[GridIndex.Down] = [GridIndex.Down, GridIndex.Left, GridIndex.Right];
gridIndexNeighbors[GridIndex.Left] = [GridIndex.Left, GridIndex.Up, GridIndex.Down];
gridIndexNeighbors[GridIndex.Right] = [GridIndex.Right, GridIndex.Up, GridIndex.Down];
@ccclass('ColorFillTexture')
export class ColorFillTexture extends Component {
    public readonly texture: Texture2D;
    public readonly sourceData: Uint8Array;
    public readonly targetData: Uint8Array;
    public readonly width: number;
    public readonly height: number;

    public constructor(source: Texture2D, public alphaThreshold: number = 100, public maxFillCount: number = 30) {
        super();
        this.sourceData = ColorFillTexture.readTexturePixels(source);
        this.targetData = Uint8Array.from(this.sourceData);
        this.texture = ColorFillTexture.createTextureFromPixels(this.targetData, source.width, source.height);
        this.width = this.texture.width;
        this.height = this.texture.height;
    }

    public setTextureColor(color: Color, x: number, y: number): boolean {
        x = ColorFillTexture.translateX(this.width, x);
        y = ColorFillTexture.translateY(this.height, y);
        return this.setColor(color, x, y);
    }

    private setColor(color: Color, x: number, y: number): boolean {
        if (x < 0 || y < 0 || x > this.width || y > this.height) return false;

        ColorFillTexture.setBufferColor(this.targetData, this.width, x, y, color);
        if (ColorFillTexture.getAlphaColor(this.sourceData, this.width, x, y) > this.alphaThreshold) return false;
        return true;
    }

    public updateTextureData(): void {
        this.texture.uploadData(this.targetData);
    }

    public fillTextureColor(color: Color, x: number, y: number) {
        x = ColorFillTexture.translateX(this.width, x);
        y = ColorFillTexture.translateY(this.height, y);
        this.fillColor(color, x, y, gridIndexNeighbors[GridIndex.Center]);
    }

    private async fillColor(color: Color, x: number, y: number, gridIndexTypes: readonly GridIndex[]) {
        let colorPointList1 = [{ x, y, neighborTypes: gridIndexTypes }];
        let colorPointList2 = [];
        let filleCount = 0;
        do {
            for (const item of colorPointList1) {
                const result = this.setColor(color, item.x, item.y);
                for (const type of item.neighborTypes) {
                    const offset = gridIndexOffset[type];
                    const nx = item.x + offset.x, ny = item.y + offset.y;

                    if (ColorFillTexture.getAlphaColor(this.targetData, this.width, nx, ny) == color.a) continue;
                    if (colorPointList2.find(v => v.x == nx && v.y == ny) == null) {
                        colorPointList2.push({ x: nx, y: ny, neighborTypes: gridIndexNeighbors[type] });
                    }
                }
                if (!result) continue;
            }

            let temp = colorPointList1;
            colorPointList1 = colorPointList2;
            colorPointList2 = temp;
            colorPointList2.length = 0;
            //
            if (++filleCount > this.maxFillCount) {
                filleCount = 0;
                this.updateTextureData();
                //Timer.instance.waitForTime(0);
            }
        } while (colorPointList1.length > 0);

        this.updateTextureData();
    }

    /**
     * 转成到图片坐标系,Cocos默认坐标系是图片的中心点,X方向向右,Y方向向上,而图片格式的坐标默认是在左上角,X方向向右,Y方向向下。
     * @param width
     * @param x
     * @returns
     */
    public static translateX(width: number, x: number): number {
        return Math.trunc(x + width * 0.5);
    }

    /**
     * 转成到图片坐标系,Cocos默认坐标系是图片的中心点,X方向向右,Y方向向上,而图片格式的坐标默认是在左上角,X方向向右,Y方向向下。
     * @param height
     * @param y
     * @returns
     */
    public static translateY(height: number, y: number): number {
        return Math.trunc(-y + height * 0.5);
    }

    /**
     * 获得该颜色buffer的alpha
     * @param buffer 颜色buffer
     * @param width 图片宽度
     * @param x x坐标
     * @param y y坐标
     * @returns 该坐标的alpha
     */
    public static getAlphaColor(buffer: Uint8Array, width: number, x: number, y: number): number {
        const index = ColorFillTexture.positionToBufferIndex(width, x, y);
        return buffer[index + 3];
    }

    public static setBufferColor(buffer: Uint8Array, width: number, x: number, y: number, color: Color): void {
        const index = ColorFillTexture.positionToBufferIndex(width, x, y);
        buffer[index + 0] = color.r;
        buffer[index + 1] = color.g;
        buffer[index + 2] = color.b;
        buffer[index + 3] = color.a;
    }

    /**
     * 点坐标转换成图片buffer的索引
     * @param width 图片的宽度
     * @param x x坐标
     * @param y y坐标
     * @param colorSize 颜色是RGB还是RGBA组成
     * @returns buffer索引
     */
    public static positionToBufferIndex(width: number, x: number, y: number, colorSize: 3 | 4 = 4): number {
        return Math.trunc(x + y * width) * colorSize;
    }

    /**
     * 读取texture的像素到一个buffer
     * @param texture texture原图
     * @param width
     * @param height
     * @param x
     * @param y
     * @returns
     */
    public static readTexturePixels(texture: Texture2D, x = 0, y = 0): Uint8Array {
        const gfxTexture = texture.getGFXTexture();
        if (gfxTexture == null) return null;

        const bufferSize = 4 * texture.width * texture.height;
        const buffer = new Uint8Array(bufferSize);

        const region = new gfx.BufferTextureCopy();
        region.texOffset.x = x;
        region.texOffset.y = y;
        region.texExtent.width = texture.width;
        region.texExtent.height = texture.height;

        director.root.device.copyTextureToBuffers(gfxTexture, [buffer], [region]);
        return buffer;
    }

    /**
     * 从像素的buffer中创建一个texture
     * @param buffer 像素buffer
     * @param width 图片宽度
     * @param height 图片高度
     * @param format 图片格式
     * @param mipmapLevel 图片的mipmap等级
     * @returns 新的texture
     */
    public static createTextureFromPixels(buffer: ArrayBufferView, width: number, height: number, format = Texture2D.PixelFormat.RGBA8888, mipmapLevel?: number): Texture2D {
        const texture = new Texture2D();
        texture.reset({ width, height, format, mipmapLevel });
        texture.uploadData(buffer);
        return texture;
    }
}
2.通过控制点击事件,实现上色功能
import { _decorator, Color, Component, EventTouch, ImageAsset, Node, Sprite, SpriteFrame, Texture2D, UITransform, v3 } from 'cc';
import { ColorFillTexture } from './ColorFillTexture';
import logicConfig from './LogicConfig';
const { ccclass, property } = _decorator;

@ccclass('Scene')
export class Scene extends Component {
    @property(Texture2D)
    texture2D: Texture2D = null;
    @property(Sprite)
    sprite: Sprite = null;
    colorFillTexture: ColorFillTexture = null;
    start() {
        this.sprite.node.on(Node.EventType.TOUCH_START, this.onTouchStart, this);
        this.createColorFill(this.texture2D);
    }

    private createColorFill(texture: Texture2D): void {
        this.colorFillTexture = new ColorFillTexture(texture, logicConfig.alphaThreshold, logicConfig.maxFillCount);
        let spriteFrame = new SpriteFrame();
        spriteFrame.texture = this.colorFillTexture.texture;
        this.sprite.spriteFrame = spriteFrame;
    }

    private onImageLoad(data: string): void {
        const image = new Image();
        image.src = data;
        image.addEventListener('load', () => {
            const texture = new Texture2D();
            texture.image = new ImageAsset(image);
            this.createColorFill(texture);
        });
    }

    private onTouchStart(event: EventTouch): void {
        const location = event.touch.getUILocation();
        const uiTransform = this.sprite.getComponent(UITransform);
        const position = uiTransform.convertToNodeSpaceAR(v3(location.x, location.y, 0));
        let color = new Color(0, 255, 0, 255);
        this.colorFillTexture.fillTextureColor(color, position.x, position.y);
    }
}
3.配置文件脚本
import { _decorator, Component, Node } from 'cc';
const { ccclass, property } = _decorator;

@ccclass('LogicConfig')
class LogicConfig {
    alphaThreshold: number = 200;
    maxFillCount: number = 30;
}
let logicConfig = new LogicConfig();
export default logicConfig;
扩展
我在demo中将颜色固定填充成绿色,需要的话可以在画面中生成几种颜色可供选择,这样图片就变得丰富多彩起来,类似于画板填充的功能就实现了
结束语
内容比较少,里面主要涉及对图片的处理,需要了解一些纹理方面的知识